CSS Tutorial
- CSS stands for Cascading Style Sheets
- Styles define how to display HTML elements
- Styles were added to HTML 4.0 to solve a problem
- External Style Sheets can save a lot of work
- External Style Sheets are stored in CSS files
CSS Syntax
-
A CSS rule has two main parts: a selector, and one or more declarations:
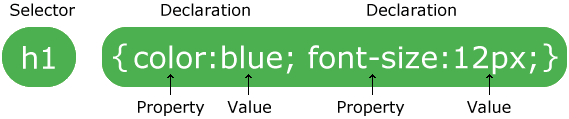
The selector is normally the HTML element you want to style.
Each declaration consists of a property and a value.
The property is the style attribute you want to change. Each property has a value.
CSS Example
p {color:red;text-align:center;}
CSS Comments
Comments are used to explain your code, and may help you when you edit the source code at a later date. Comments are ignored by browsers.A CSS comment begins with "/*", and ends with "*/", like this:
/*This is a comment*/
p
{
text-align:center;
/*This is another comment*/
color:black;
font-family:arial;
}
CSS Id and Class
The id Selector
The id selector is used to specify a style for a single, unique element.The id selector uses the id attribute of the HTML element, and is defined with a "#".
The style rule below will be applied to the element with id="para1":
Examples
#para1
{
text-align:center;
color:red;
}
The class Selector
The class selector is used to specify a style for a group of elements.
Unlike the id selector, the class selector is most often used on several elements.
This allows you to set a particular style for many HTML elements with the same class.
The class selector uses the HTML class attribute, and is defined with a "."
In the example below, all HTML elements with class="center" will be center-aligned:
Example
p.center {text-align:center;}
Three Ways to Insert CSS
There are three ways of inserting a style sheet:- External style sheet
- Internal style sheet
- Inline style
External Style Sheet
An external style sheet is ideal when the style is applied to many pages.With an external style sheet, you can change the look of an entire Web site by changing one file. Each page must link to the style sheet using the <link> tag.
The <link> tag goes inside the head section:
<head>
<link rel="stylesheet" type="text/css" href="mystyle.css">
</head>
An external style sheet can be written in any text editor.
The file should not contain any html tags.
Your style sheet should be saved with a .css extension. An example of a style sheet file is shown below:
hr {color:sienna;}
p {margin-left:20px;}
body {background-image:url("images/back40.gif");}
Internal Style Sheet
An internal style sheet should be used when a single document has a unique style.You define internal styles in the head section of an HTML page, by using the <style> tag, like this:
<head>
<style>
hr {color:sienna;}
p {margin-left:20px;}
body {background-image:url("images/back40.gif");}
</style>
</head>
Inline Styles
An inline style loses many of the advantages of style sheets by mixing content with presentation.Use this method sparingly!
To use inline styles you use the style attribute in the relevant tag.
The style attribute can contain any CSS property. The example shows how to change the color and the left margin of a paragraph:
<p style="color:sienna;margin-left:20px">This is a paragraph.</p>
Multiple Style Sheets
If some properties have been set for the same selector in different style sheets, the values will be inherited from the more specific style sheet.For example, an external style sheet has these properties for the h3 selector:
h3
{
color:red;
text-align:left;
font-size:8pt;
}
And an internal style sheet has these properties for the h3 selector:
h3
{
text-align:right;
font-size:20pt;
}
Multiple Styles Will Cascade into One
Styles can be specified:- inside an HTML element
- inside the head section of an HTML page
- in an external CSS file
Cascading order
What style will be used when there is more than one style specified for an HTML element?Generally speaking we can say that all the styles will "cascade" into a new "virtual" style sheet by the following rules, where number four has the highest priority:
- Browser default
- External style sheet
- Internal style sheet (in the head section)
- Inline style (inside an HTML element)
CSS Background
Background Color
The background-color property specifies the background color of an element.The background color of a page is defined in the body selector:
Example
body {background-color:#b0c4de;}
- a HEX value - like "#ff0000"
- an RGB value - like "rgb(255,0,0)"
- a color name - like "red"
h1 {background-color:#6495ed;}
p {background-color:#e0ffff;}
div {background-color:#b0c4de;}
Background Image
The background-image property specifies an image to use as the background of an element.By default, the image is repeated so it covers the entire element.
The background image for a page can be set like this:
body {background-image:url('paper.gif');}
Background Image - Repeat Horizontally or Vertically
By default, the background-image property repeats an image both horizontally and vertically.Some images should be repeated only horizontally or vertically, or they will look strange, like this:
If the image is repeated only horizontally (repeat-x), the background will look better:
body
{
background-image:url('gradient2.png');
background-repeat:repeat-x;
}
Background Image - Set position and no-repeat
When using a background image, use an image that does not disturb the text.
Showing the image only once is specified by the background-repeat property:
body
{
background-image:url('img_tree.png');
background-repeat:no-repeat;
}
In the example above, the background image is shown in the same place as the text.
We want to change the position of the image, so that it does not disturb the text too much.
The position of the image is specified by the background-position property:
body
{
background-image:url('img_tree.png');
background-repeat:no-repeat;
background-position:right top;
}
Background - Shorthand property
As you can see from the examples above, there are many properties to consider when dealing with backgrounds.To shorten the code, it is also possible to specify all the properties in one single property. This is called a shorthand property.
The shorthand property for background is simply "background":
body {background:#ffffff url('img_tree.png') no-repeat right top;}
CSS Text
Text Color
The color property is used to set the color of the text.With CSS, a color is most often specified by:
- a HEX value - like "#ff0000"
- an RGB value - like "rgb(255,0,0)"
- a color name - like "red"
The default color for a page is defined in the body selector.
body {color:blue;}
h1 {color:#00ff00;}
h2 {color:rgb(255,0,0);}
Text Alignment
The text-align property is used to set the horizontal alignment of a text.Text can be centered, or aligned to the left or right, or justified.
When text-align is set to "justify", each line is stretched so that every line has equal width, and the left and right margins are straight (like in magazines and newspapers).
Example
h1 {text-align:center;}
p.date {text-align:right;}
p.main {text-align:justify;}
Text Decoration
The text-decoration property is used to set or remove decorations from text.The text-decoration property is mostly used to remove underlines from links for design purposes:
a {text-decoration:none;}
It can also be used to decorate text:
h1 {text-decoration:overline;}
h2 {text-decoration:line-through;}
h3 {text-decoration:underline;}
h4 {text-decoration:blink;}
Text Transformation
The text-transform property is used to specify uppercase and lowercase letters in a text.It can be used to turn everything into uppercase or lowercase letters, or capitalize the first letter of each word.
Example
p.uppercase {text-transform:uppercase;}
p.lowercase {text-transform:lowercase;}
p.capitalize {text-transform:capitalize;}
p.lowercase {text-transform:lowercase;}
p.capitalize {text-transform:capitalize;}
Text Indentation
The text-indentation property is used to specify the indentation of the first line of a text.Example
p {text-indent:50px;}
Space between Characters
h1 {letter-spacing:2px;}
h2 {letter-spacing:-3px;}
Space between Lines
p.small {line-height:70%;}
p.big {line-height:200%;}
Direction of an Element
div.ex1 {direction:rtl;}
Increase the white space between lines
p
{
word-spacing:30px;
}
Disable text wrapping inside an element
p
{
white-space:nowrap;
}
No comments:
Post a Comment