Checkboard Transition Effect in Flash
Tutorial Details
Program: Flash CS3Difficulty: All
Estimated Completion Time: 1 hr
Tutorial Assets
The following assets were used during the production of this tutorial.Source File ( .fla )
Tutorial Steps
In this tutorial, you will learn how to create a masking effect which creates your picture vertically means bottom to top or horizontally means left to right, and reverse also. Here we are taking the stage dimensions as 500x300 and the FPS is 24, as shown in the Figure below. To start with the tutorials download the Check_mask_tutorial.rar file that will provide you with the necessary files to be used in the tutorial.
1. First we will learn how to create different masks for an image. For this we will import our scene image to the stage. To do that, choose File > Import from the main menubar and choose the downloaded images and import them on stage.
2. Next, set the stage size equal to the width and height of the images and convert all the images to a movieclip simultaneously and name them as img1, img2, and img3 respectively, as shown in Figure below.
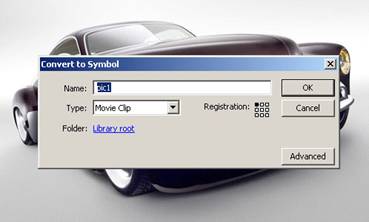
3. Select the image and convert it to the movie-clip symbol by the name as pic1. Again convert pic1 symbol to movie-clip symbol using the name as Masking1. We are taking movie-clip symbol only because to use some filters effect on the image to get more powerful effect. See the reference image below:
4.
Next step
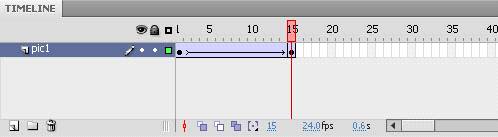
is to create a classic tween to give an simple zoom out animation effect. Open the Flash Timeline, give
the layer name a pic1. Press F6 on
the frame 15 to insert a new key frame and convert frames to classic tween. Now give the ease value to 100% to get smooth zoom
effect from fast to slow animation effect.
See the reference image below:

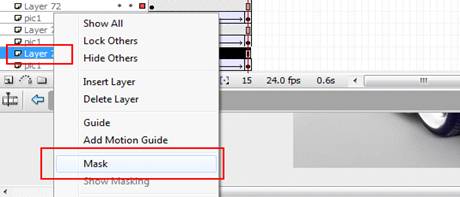
6.
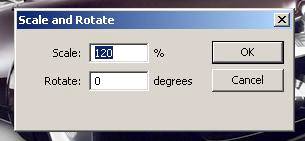
Now, It’s time to create a mask shapes. We will
create a simple rectangle shape. Make sure that how many pieces we need. The stage dimension is 500x300 and we have to cover complete stage by placing mask shapes.
Number of mask shapes will create more beautiful and impactful effect. Here we
will create 12 rectangle boxes. That is why the width of the boxes will be
125px to cover the stage or image width and the height will be 100px. So that
the box dimensions are 125x100px.
See the reference image below:

7.
Now, Distribute all 12 rectangle shapes to
different layers (Select all
shapes>Right click>distribute to layers). See the reference image below:
See the reference image below:

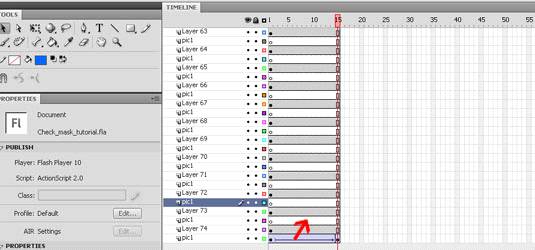
8.
Now we got
12 shapes layer, these all are mask shape. Then insert 1 layer below each shape
layer. See the reference image below:

9.
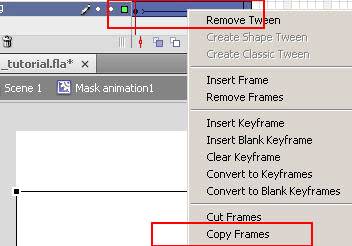
We will
copy the same image animation. To copy frames, Select all Frames > Right Click on the frames > Select Copy
frames. See the reference image
below:
10.
Paste copied frames to each blank layer or to
copy layer, select the tween layer > press alt key + Drag on to the blank layer.
Now, To create the effect of image appearance in parts. We will
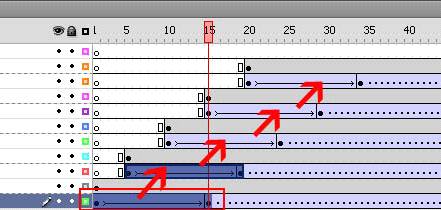
give some frames space after each mask. As of now we are taking 5 frames gap. See the reference image below:

11.
Publish your file and watch the effect. Currently, we will find image
parts are appearing but it is not building the complete image. To solve this
problem we will insert frames on the animation end. See the reference image below:

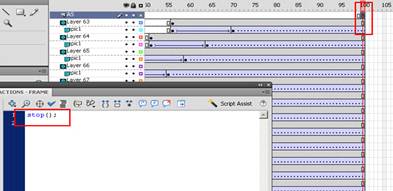
12.
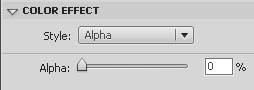
Here we need to stop the animation at the end as
the complete image will be visible. Insert a new layer on the top of the all
layers and insert a new key frame at the end of the animation, go to the action
panel and give action: stop();
See the reference image below:
See the reference image below:
Now we have
created a 70 frames animation effect. To give pause to the image, we can insert
more frames according to the choice. See
the reference image below:
13.
Now, we want to jump to the next image using the
same effects. Copy the Masking1 movie-clip and paste it to the new layer names. Select the Masking1 symbol > right click > duplicate symbol named
as Masking2. The same procedure can be applied for Masking3 or further more images.
14.
Edit the Masking2 symbol. On the first frame, Right click on the image and change to duplicate
image named as pic2. Edit pic2 symbol and replace the image from
the library.
15.
Select
frames > Press alt key > Drag frames to other animation layer to replace
the frames. Apply the same
procedure to the next step as given in the reference image below.
16.
Apply the
same procedure to the Masking3 and
further Maskings.
17.
Go to the main timeline put All 3 masking’s to
the 3 different layers with the gap of 70 frames. 70 frames gap is to play the
masking animation and 20 frames gap is to pause the
image for some time.

Here is the final effect.
No comments:
Post a Comment